nielssp.dk

There isn't much to say about this one. It started out as a desire to play Yukon in a terminal – I could only find a few implementations of Klondike. So I created yuk, a simple ncurses-based Yukon implementation in C. I then realized that most of the code could easily be reused to implement other games, such as Klondike and Freecell. The result was csol.

csol
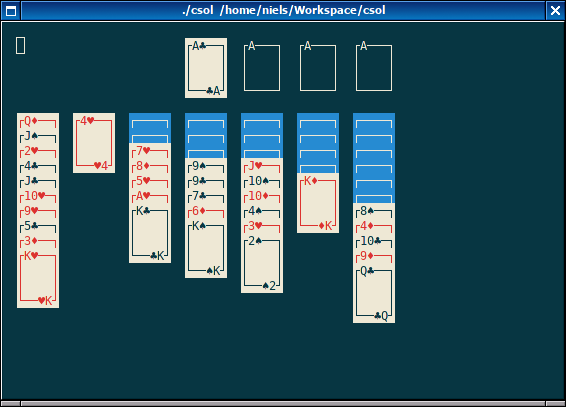
A game of Yukon in csol.

At the moment, csol includes 5 different solitaire games: Yukon, Klondike, Freecell, Eight Off (very similar to Frecell), and Russian Solitaire (very similar to Yukon). They are implemented in a simple declarative language I designed for csol. It should be possible to implement a lot more games using it, but unfortunately I don't know that many different solitaire games. csol also has support for different themes using the same declarative language.

Some more screenshots of games and themes, as well as the source code, are available on the github repository. As usual, I've also created an aur package.

Fujitsu Lifebook P1630
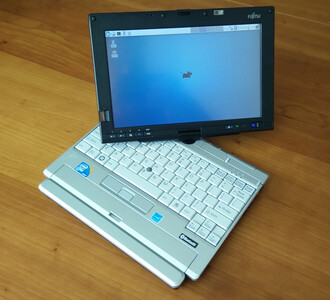
A Fujitsu LifeBook P1630 running Arch Linux with Xfce.

I recently bought a somewhat old convertible tablet PC for $65 USD on eBay. The Fujitsu LifeBook P1630, which was originally sold for more than $2,000 USD back in 2008, is a small laptop/tablet PC with a 1.2GHz Intel Core 2 Duo and an 8.9″ resistive touchscreen display (1280×768). Size-wise it is similar to the netbooks (like the Asus Eee PC) that were starting to get popular at the time, but it is definitely much more powerful than the early netbooks (and also much more expensive at the time of its release). Although it was originally sold with Windows Vista (and mine came with Windows XP Tablet PC Edition), I immediately decided that I would put Linux on it, partially because I was curious about how well Linux would work with a touchscreen (Android doesn't really count). Speaking of Android, the P1630 is a bit different from modern tablets: Like other older tablet PCs it has a resistive touchscreen instead of the capacitive touchscreen found in smartphones and most post-iPad tablets. This means that the touchscreen can only be used with sharp objects, like the plastic stylus that comes with it (or fingernails, but that feels a bit awkward).

The unit I got was in pretty much perfect condition, and doesn't have any visible scratches or marks on the case. It certainly doesn't look like an 8 year old computer, so it probably hasn't been used much. The only problem listed in the eBay listing was a BIOS password unknown to the seller. I decided to buy it despite the BIOS password, since I assumed it could be reset one way or another (and I was right). It also didn't come with an AC adapter, so I had to throw in another $10 for an unoriginal AC adapter from China.

Continue reading…

Ever wanted a simple calculator within Vim? Since vimscript is already a fully featured programming language, you've already got it! For instance you can type :echo 2 + 5 in normal mode and get the result 7. You can also enter Ex-mode by typing Q in normal mode. In Ex-mode you can type commands without first typing :, however you still have to type echo to print the result of expressions. When in insert mode you can also press <c-r>= (an equals sign should appear in the bottom left corner) followed by a vimscript expression. This inserts the result of the expression at the current cursor position.

To get a proper read–eval–print loop (REPL) for vimscript expressions, I've added the following function to my .vimrc:

function! Repl()
  while 1
    let expr = input('> ', '', 'expression')
    if expr == 'q' | break | endif
    if expr != ''
      echo "\n"
      if expr =~ '='
        execute 'let ' . expr
      else
        let ans = eval(expr)
        echo string(ans)
      endif
    endif
  endwhile
endfunction
nnoremap <leader>c :call Repl()<cr>

You start it by pressing <leader>c in normal mode (or :call Repl()). I use space as my leader (let mapleader = " "), so by pressing space followed by “c” a prompt displays at the bottom of the window. To exit the REPL, you type “q” and then press enter. Any expression you type while in the REPL is evaluated. The result of the expression is printed and saved in the ans-variable, so that it can be reused in the next expression.

> 25 - 5
20
> ans * 5 / 2
50
> ans / (2 + 3)
10

If the input contains an equals sign it is interpreted as a let-command. This can be used to easily define variables:

> a = 2
> b = 4
> c = pow(a, b)
> c
16.0

When Vim is compiled with floating point support (:echo has('float') returns 1), you can also do floating point arithmetic.

> 3 / 2
1
> 3 / 2.0
1.5

The following mathematical functions are built into vimscript (when compiled with floating point support):

abs() trunc() floor() ceil() round() float2nr()
fmod() pow() sqrt() exp() log() log10()
sin() cos() tan() sinh() cosh() tanh()
asin() acos() atan() atan2()

That's about it. It's pretty simple, but it can be quite useful when you need to do a couple of calculations.
Today, I replaced the home-cooked CMS (Jivoo CMS), which this blog was running on, with a home-cooked static site generator (with a web-based GUI similar to a CMS) that I'm working on. I also changed the design a bit… Considering it's been around 15 months since my last post, I guess I just find it easier to work on the technical parts of a blog rather than the actual content. I do however have a number of shorter posts planned for the near-future.

See also: Jivoo, BLOGSTEP, nielssp.dk

This post is part of a series on Programming Language Design in Scala (PLDS). Click here to see the rest of the posts in the series.

In September 2014 I stumbled upon the Scala Parser Combinators library and ended up playing around with implementing a small programming language in Scala. Although the language itself was more or less useless, I thought that the process of designing and implementing it (and later extending it with more features) was a pretty fun activity. This then gave me the idea to start this blog as a place for programming and computer science related topics that I find interesting. My first blog post was supposed to be a short tutorial or introduction to Scala Parser Combinators based around the implementation of a small programming language. Because of a lack of motivation, ideas and time, my first post instead ended up being about an entirely different project, and my post about parser combinators remained an unfinished draft for more than six months.

Now I've finally found the energy to complete this project, or at least the first part of it. My idea is to write a series of blog posts about the design and implementation of programming languages using practical examples in Scala (and perhaps other languages in the future). The first two posts will be about the syntactic analysis part of a language implementation, i.e. parsing the source code. This very first post will briefly introduce language design, formal definition of syntax, and how to implement a scanner in Scala. A scanner (also known as a tokenizer or a lexer) is a simple program that reads a sequence of characters (the source code) and outputs a sequence of tokens, i.e. a sequence of syntactical components. This process is known as lexical analysis (and also sometimes tokenization), and is usually what precedes the actual parsing step, where a parse tree or an abstract syntax tree is constructed from the sequence of tokens. The parsing step is described in the next post, so for now we'll just be looking at the scanner.

This post should serve as an introduction to—and shouldn't require any prior knowledge of—language design and Scala, although a basic understanding of programming and programming languages is a prerequisite. I also recommend reading some tutorials if you're interested in learning more about Scala.

Continue reading…